Prism Central as a new sizing option in the workload dropdown.
Size for Single VM / Scale-out deployment options
Considers resource requirements for add-ons : Self Service/Flow/Prism Operations
Please note that this is an added option where users can manually add PC to the cluster. In addition, selecting Prism Central from solutions option continue to exist.
Split large workloads into multiple clusters:
Earlier, extremely large workloads gave a no optimal solution message when the workloads do not fit in a single cluster.
With split workload functionality, Sizer automatically creates multiple clusters and splits workloads across the clusters optimally.
Currently supported for Cluster(raw) sizing only
This should be especially helpful in two scenarios: large imports from Collector and sizing on NC2 on AWS/Azure with smaller max node limit.
Insights imports: Auto create existing cluster
When importing from Insights, there is an option to auto-recreate existing cluster.
This will create the cluster with the existing HW configuration (today it defaults to latest gen models and users must manually configure existing HW)
Only additional nodes need to be manually configured if considering for expansion.
Proposals:
Latest HW spec on NX G9 and HPE DX G11
Usability enhancements:
View workload:
Currently it captures only essential workload inputs.
Now there is a ‘View All details’ that opens the workload page in view mode to view all inputs.
No need to clone just to see workload inputs.
Platforms: Dell 16G (Intel SPR) platforms
A short demo on splitting workloads into multiple clusters:
We went live with the current sprint and excited to highlight a few major features.. one of which has been frequently requested by the SE community ..
Intel / AMD (View Other Alternatives) :
You would notice the ‘view other alternatives’ appear just below the default solution (pic below)
The solution includes the AMD models option for the same workload along with the Intel(default) models (along with the cost delta)
As per NX team, with the introduction of NX AMD models, there may be situation where the AMD option may come out to be optimal thus having both presented gives a broader perspective and may help drive its adoption.
The alternative option is not restricted to NX but is applied across vendors(which support AMD models).
Collaboration / Sharing with edit access:
One of the frequently requested features. Earlier sharing was read only, and users had to clone (under their name) to make edits.
While sharing, you can now choose to share as ‘read only’ or ‘write’. The latter allowing the shared user to make edits to the same scenario.
Only one user can make edits at a time and the scenario is locked by/for the user. It can be seen as ‘Active Editor’ on the top , next to scenario owner (pic below)
Once the active editor finishes making changes and scenario is in idle state, it releases the scenario for editing by others.
Alternatively, the active user can also release it immediately by clicking on ‘Stop editing’ button.
As the first phase, this is enabled only for internal users via SFDC login, opening to IDP/Partner login is in plan.
The latest release of Nutanix Collector 5.0 is now available for download.
WHAT’S NEW
Nutanix Collector 5.0 adds support to gather data from AWS environments using Windows command line interface (CLI) mode. You can gather the configuration and performance data of the AWS resources that help understand the cloud infrastructure requirements accurately and can be exported to Sizer to size the workloads either on NC2 on AWS or on-prem datacenter.
Gather details about the Elastic Compute Cloud (EC2) instances, Elastic Block Storage (EBS) volumes, Snapshots, and Elastic File System (EFS)
Gather data across multiple Organization Units and/or Accounts in one go
Instantaneously gather utilization or performance patterns up to 180 days
Gather utilization data of EC2 instances – Average, Peak & 95th Percentile CPU utilization
Gather performance data of EBS Volumes – IOPS, IO Size & Throughput
Option to export the data from Collector Portal to Sizer
This article explains the logic for storage calculations for clusters having node with different storage capacities
What has changed?
Previously, the capacity calculations had been based on aggregate capacity across nodes in the cluster. This total capacity used to be the base for calculating usable and effective capacity in the cluster.
For example: Consider 3 nodes , N1=20TB, N2=20TB and N3=10TB
Based on the above, the total capacity available is 20+20+10 = 50TB and assuming (N+1) , the available nodes are N2+N3 = 30TB. Thus, 15TB can be used for data and 15TB for RF (assuming RF2)
With the new update: Sizer also ensures that the RF copy of the data and the data itself do not share the same node.
In the above example: after N+1, two nodes are available N2 = 20TB ,N3 = 10TB.
If we allow writing 15TB of data (and 15 for RF), part of the data and RF has to be on same node as N3 is only 10TB. So, to ensure the RF copy and data is on separate nodes, the usable storage in this case would be 20TB ( 10TB of data on N2 and its RF on N3 or vice versa).
Note: Although the same logic is used for both homogeneous and mixed capacity clusters, the difference is seen primarily for the mixed capacity clusters.
Here is a detailed write up on how the usable storage is calculated for clusters with mixed capacity nodes for different scenarios across RF2 and RF3
Algorithm for RF2
If we have only one node with non-zero capacity Cx, then in RF2 the replication is done between the different disks of the same node and hence the extent store in this case will be Cx / 2 (RF), else one of the below cases applies. Let us say, we have nodes with capacities C1, C2, C3, …., C[n] which are in sorted order according to their capacities. There are 2 cases to consider for RF2, to compute the effective raw storage capacity:
Case-1: C1 + C2 + C3 + …. + C[n-1] <= C[n] If this is the case, then the total amount of storage that can be replicated with a factor of 2 is ∑(C1, C2, C3, …., C[n-1])
Case-2: C1 + C2 + C3 + …. + C[n-1] > C[n] If this is the case, then the (total storage capacity) / 2 (RF) can be replicated among the available nodes. In other words, half the total capacity can be replicated.
Algorithm for RF3
Let us say, we have nodes with capacities C1, C2, C3, …., C[n] which are in sorted order according to their capacities. Algorithm for RF3 is slightly different from that of RF2 because we need to accommodate the replica of data on 2 nodes, as opposed to a single node on RF2.
Since there are 3 replicas to place, we calculate the capacity difference between the 2nd largest (C[n-1]) and the 3rd largest (C[n-2]) entities as ‘diff’. This information is necessary so that given an optimal placement scenario where the first replica is placed on the entity with the smallest capacity, the second replica is placed on the entity with the largest capacity (C[n]) and the third replica is placed on the entity with the 2nd largest capacity (C[n-1]); the difference between the 2nd and the 3rd largest capacities ((C[n-1]) – (C[n-2])) will help us quickly deduce when the 2nd largest entity will become equal to the 3rd largest entity by virtue of space consumed on the former via replica placement.
By deducting either the ‘diff’ calculated above (or) the capacity of the smallest entity and simulating RF3 placement such that C[n-2] and C[n-1] have now become equal (note that the difference between C[n] and C[n-1] will remain constant during this since the same capacity is deducted from both of them), in O(N) we arrive at the possibility of:
Case-1:Only 3 entities remain with non-zero capacities, in which case the amount of data that can be accommodated among these 3 nodes with RF of 3 (one actual node and 2 replicas) is the smallest remaining capacity, which is C[n-2].
Case-2:There is capacity left in C[n-3] (i.e. the 4th largest entity) and any number of nodes before it (i.e., C[n-4], C[n-5], … etc) and C[n-2] == C[n-1] (i.e. the capacities remaining on the third and the second largest entities have become equal). This is because at this point, the capacity on the smallest entity remaining (the smallest non-zero entity before C[n-2] i.e) is greater than C[n-1] – C[n-2], indicating that after placing the first replica on C[n] and second replica on C[n-1], the time has come where the capacity on C[n-1] == C[n-2]. At this point, for the next bytes of data, the second replica will go to C[n] while the third replica will be round robin-ed between at least 2 (or more) entities. Now in this scenario as well, 2 cases can arise:
Case-2(a): (C1 + C2 + … + C[n-1]) / 2 <= C[n] Now, if C[n]’s capacity is so high that it means that for every 1st and 3rd replicas placed on the lowest capacities nodes upto C[n-1], the second replica always finds space on C[n], then it implies that, if (C1 + C2 + … + C[n-1]) / 2 <= C[n], then the amount of storage that can be accommodated on available nodes with RF of 3 is the lowest among the two sides of the above equation i.e., (C1 + C2 + … + C[n-1]) / 2, as we cannot consume the full space on C[n].
Case-2(b):(C1 + C2 + … + C[n-1]) / 2 > C[n] But if C[n]’s capacity is not so high as in case (a), i.e., (C1 + C2 + … + C[n-1]) / 2 > C[n], then replica placements for one of the replicas will be on the largest entity C[n], while the other two replicas will round-robin amongst the other largest capacity entities (since the capacities remaining on at least 2 entities C[n-2], C[n-1] are already equal). This will continue until C[n] becomes equal to C[n-1], which is guaranteed to happen eventually because the replicas consume space on C[n] at least at a rate double than C[n-1], C[n-2], … From that point, both the second and the third replicas will continue being round robin-ed across all the remaining entities, and thus all the capacities remaining at that point can be fully consumed. Hence, in this case, the amount of storage that can be accommodated is the sum of all remaining (non-zero) entities divided by 3 (RF).
Terminologies
Effective Usable Capacity = 95% of (Raw capacity – failover capacity based on RF)
95% because AOS stops writing to the disk when the cluster utilization reaches 95%.
Nutanix Validated Design – AOS 6.5 with Red Hat OpenShift
Nutanix delivers the Validated Design – AOS 6.5 with Red Hat OpenShift as a bundled solution for running Red Hat OpenShift 4.12 that includes hardware, software, and services to accelerate and simplify the deployment and implementation process. This Validated Design features a full-stack solution for hybrid cloud deployments that integrates not only products like Nutanix NCI and NUS but also Red Hat OpenShift Platform Plus including Red Hat Quay and Advanced Cluster Manager.The Validated Design – AOS 6.5 with Red Hat OpenShift sizer reference scenario has the following features:
A baseline configuration for each Availability Zone is comprised of three clusters:
Management – 4-16 nodes cluster based on NX-3170-G8 for Prism Central, Active Directory, OpenShift Hub Cluster for Quay Registry and Advanced Cluster Manager, and any other management services including OpenShift Controlplane when using “large footprint” layout.
Workload – 4-16 nodes of NX-3170-G8 for Red Hat OpenShift Workloads.
Storage – 4-node cluster of NX-8155-G8 for Nutanix Files and Nutanix Objects.
A dedicated management cluster in each Availability Zone provides increased availability, security, operations, and performance. Management Cluster starts with 4 nodes and can be scaled up to 16 nodes if multiple “Large Footprint” OpenShift Clusters should be deployed.
The workload cluster has a defined maximum size of 16 nodes, which provides a reasonable maintenance window for rolling firmware and software upgrades. Smaller workload clusters can be deployed, but the maximum size should not exceed 16 nodes.
NVD defines two footprint for OpenShift Cluster Sizes:
Small Footprint, OpenShift Controlplane shares same workload cluster as worker nodes, maximum of 25 worker nodes
Large Footprint, OpenShift Controlplane runs in Management Cluster, worker nodes are running in workload cluster
Table: OpenShift Cluster Sizing: OCP Cluster (Workload) Small Footprint
Component
Instances
Size
Control plane
3
4 CPU cores, 16 GB
Infrastructure
3
4 CPU cores, 16 GB
Worker
2+ (max 25)
4 CPU cores, 16 GB
Table: OpenShift Cluster Sizing: OCP Cluster (Workload) Large Footprint
Component
Instances
Size
Control plane
3
16 CPU cores, 128 GB
Infrastructure
3
16 CPU cores, 128 GB
Worker
2+ (max 360)
Minimum 4 CPU cores, 16 GB
Services SKUs are not included in the Sizer reference scenarios. Review the BOM in the NVD appendix for the complete list of Services SKUs which should be included.
It is extremely important to review the entire Validated Design – AOS 6.5 with Red Hat OpenShift on the Solutions Support portal to understand the complete validated solution.
With the current release, Sizer introduces two new capabilities .. Compute-only/Storage-only nodes and linking Frontline quotes:
Compute-only/Storage-only nodes:
Cluster settings has Node type to select only HCI solution(or with CO or SO options)
Supports the DBOptimized nodes (CO+SO) as part of AOS 6.6.2
In UI, the nodes will be tagged as CO or SO to identify the node types
In manual mode, you can treat a node as CO or SO by tagging
As you know, this should help creating a solution especially on databases optimizing on 3rd party licenses
Linking quotes
All Frontline quotes generated for that scenario can be referenced via ‘Related quotes’ pop-up
Includes quoteId link along with the status and date created/modified
This will be helpful in tracking the scenarios to quotes for past or future reference
We will be soon coming up with a concept of primary sizing(locking it once quote is created) and allow edit only on clone. This would help avoid 1 to many mappings and better tracking.
Other enhancements:
Discounts pre-filled in budgetary quote is more aligned with good/target discounts from Frontline
Expert cluster templates – models changed to NG8
NC2 clusters max limits-13 for NC2/Azure and 28 for NC2/AWS
vCPU:pcore for imported workloads – using exact ratio (no rounding off)
The latest release of Nutanix Collector 4.4 is now available for download.
WHAT’S NEW
Nutanix Collector provides you an option to gather data for virtual Microsoft (MS) SQL servers (version 2016 or higher) using Windows Command Line Interface (CLI) mode. You can gather the configuration data of the SQL servers that are helpful in sizing the Nutanix Database Service requirements accurately. Nutanix Collector gathers the below information.
DB Servers: Cluster role, Witness, Operating System, Sockets, Processors, CPU & Memory information.
SQL Instances: Name of the instance and DB server, SQL version, DB count, collation, authentication mode, concurrent, and active connections.
Databases: Name, ID, and size of the database, DB server, active connections, availability group, recovery model, and backup details.
Database Files: Name and ID of the database, type & size of the file, filegroup, used and free space, and file growth.
Availability Group: Name and status of the availability group, databases, replica, role, availability mode, failover mode, seeding mode, and listener details.
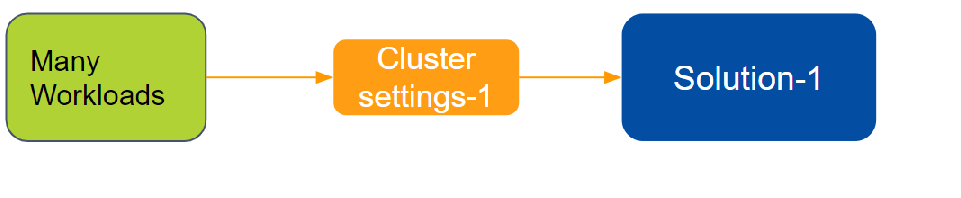
Sizer 6.0 has come up with a concept of cluster profiles. These are specific cluster settings for a sizing. The cluster profile is user-defined and users can create as many profiles as needed by giving the profiles a unique name.
How does creating a cluster template help ?
Different types of workloads have different preferences for the recommended solution. For example – a Database cluster would be quite different from a VDI cluster. Whereas a DB cluster would almost always be All Flash or for some SEs even prefer All NVMe nodes, a hybrid node for VDI cluster would be sufficient in most cases. These are different options in the cluster settings that can be set for the given workload by the users.
Another example is preferred set of models. Some customers would like to go with certain models (already existing in their environment) or filter out certain models (for ex: 1065 as it is single SSD).
Currently, SEs change these filters and preferred options in the cluster settings page every time for a new scenario/sizing.
With Sizer 6.0, Nutanix SEs and partners can save these settings (as a cluster template) and use it for future sizings.
For example: There are certain settings a user typically prefer for Oracle
1. Nodes have to be All Flash (or NVMe)
2. Should be a hot processor (>3.0GHz)
3. Only certain models (NX-8050 , NX-8070)
SEs can save an Oracle cluster profile with these settings and import this profile every time they size for an Oracle workload. This helps avoid repeating the settings every time making the sizing process faster and consistent.
Power of Cluster template/Expert Library:
Leveraging Nutanix expertise:
Why care?
Focus on the Workloads with the customer and then let your preferred cluster settings control Auto sizing and yield strong solution
Can get more consistency across wide range of Sizer users
You don’t have to know all 18 vendors in Sizer (focus on workloads and software and less on HW)
Can easily compare multiple vendors
Brings uniformity to solutioning
Across different user persona(expert, moderate, beginner)
Across internal SEs and partners
Removes the need to be Nutanix technology expert or expert of the workload being sized(eg Database)
How do I create a cluster template?
There are two ways to create a user-defined cluster profile in Sizer.
Directly creating cluster profile from user preferences
Saving an existing cluster setting as profile while doing a sizing
Steps for creating user defined templates:
Directly creating template from user preferences
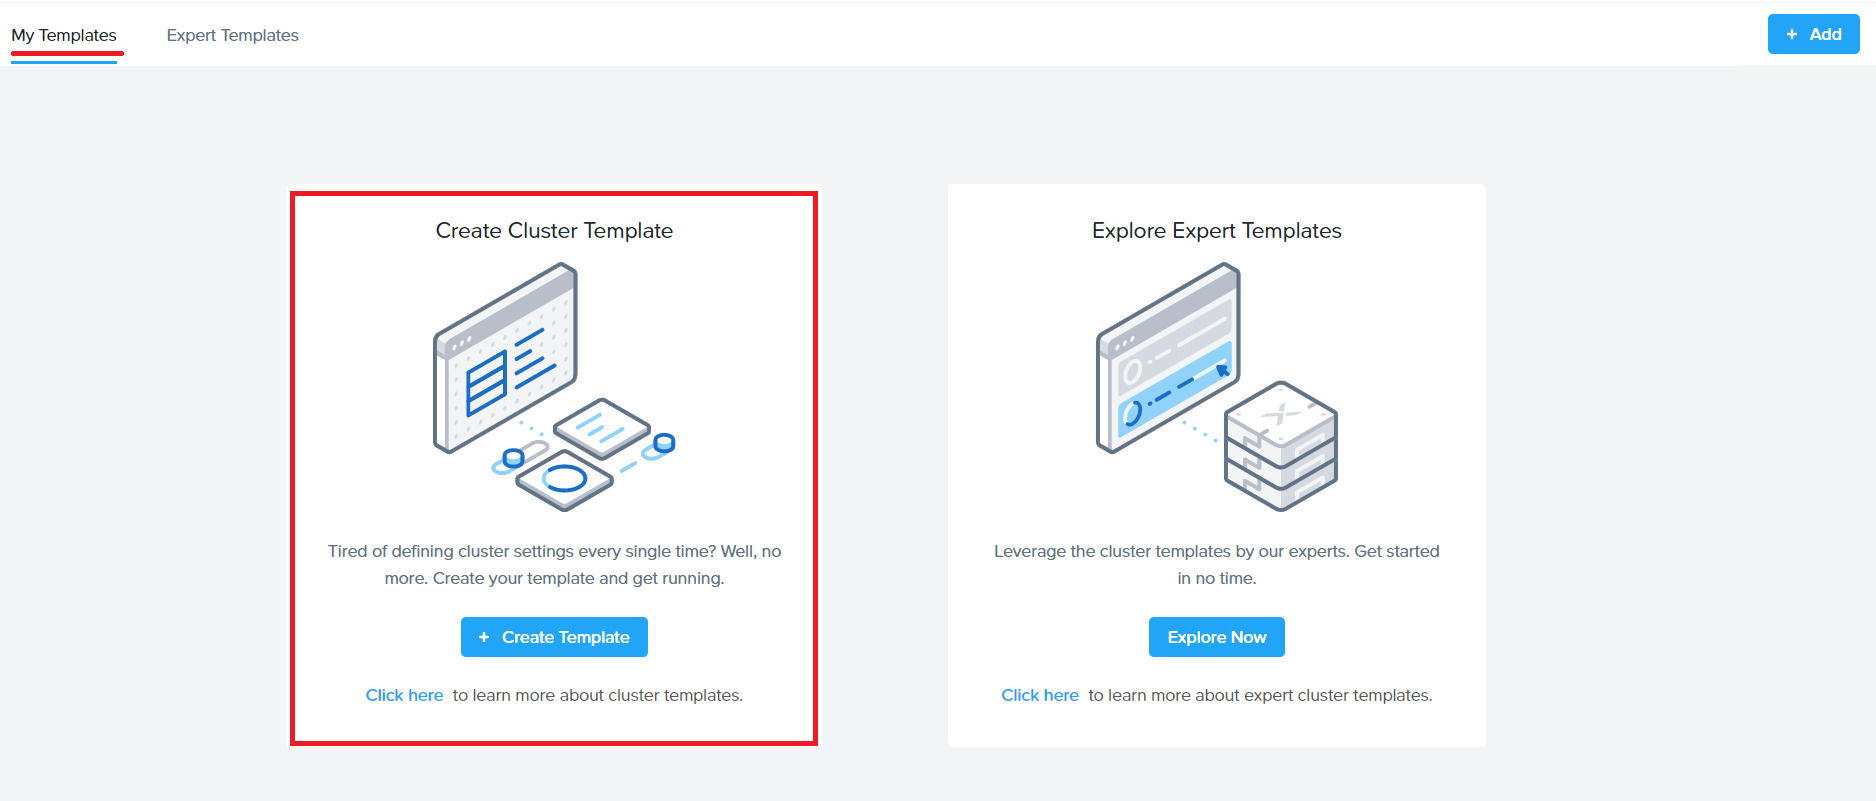
Go to the User icon on the top right corner and click Templates (pic 1)
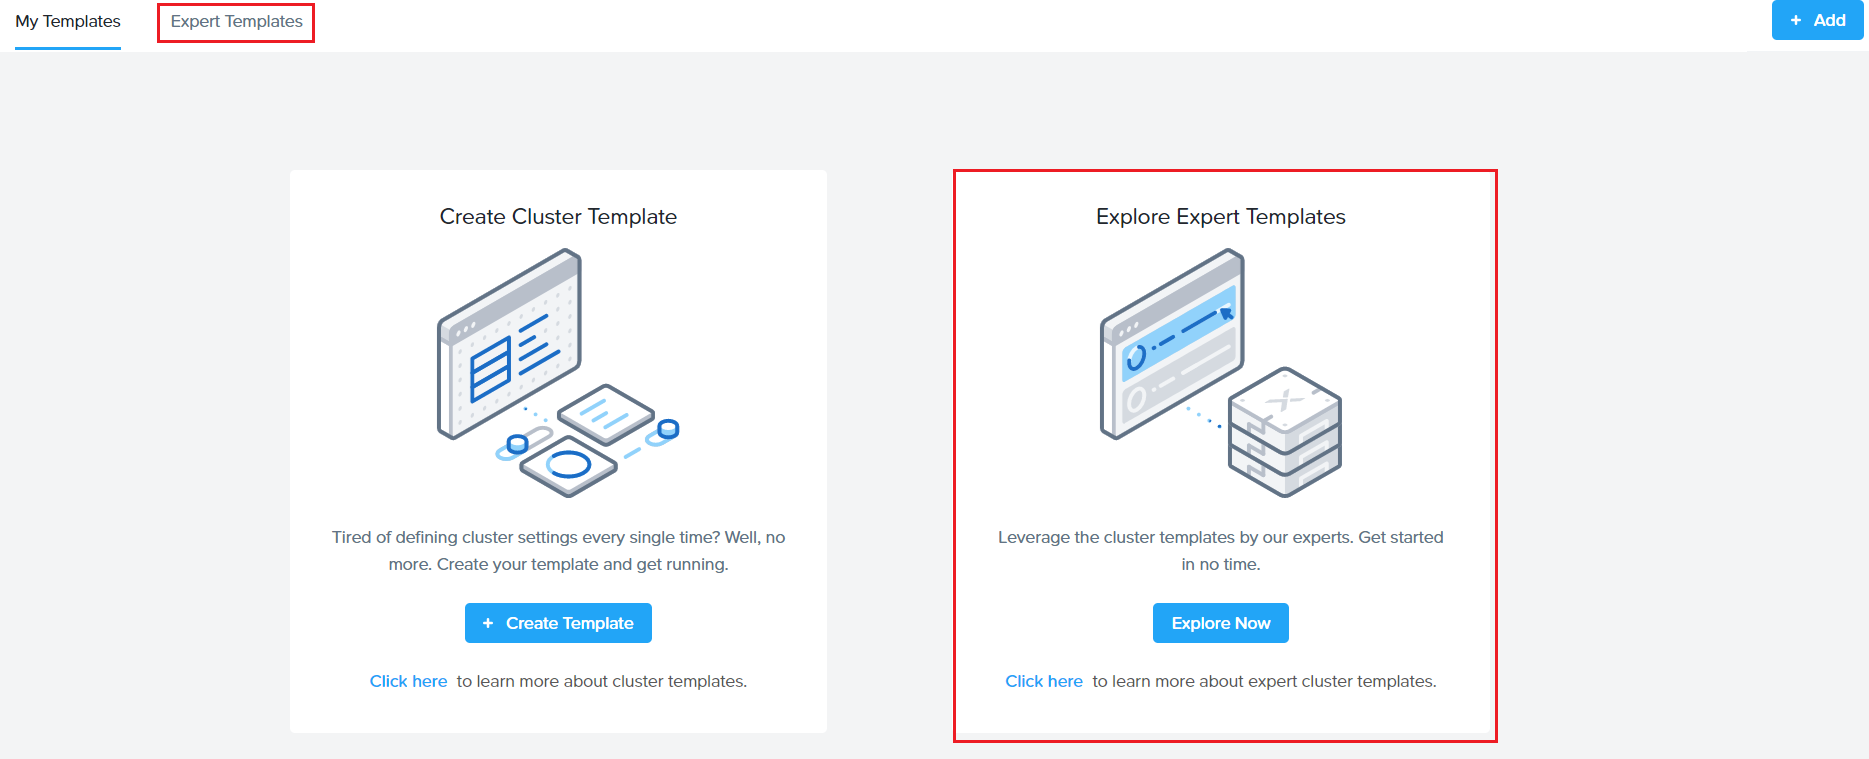
There are two approaches to templates.
Under ‘Templates’ , click on ‘ClusterTemplate’
Click on Create in the next screen (shown below)
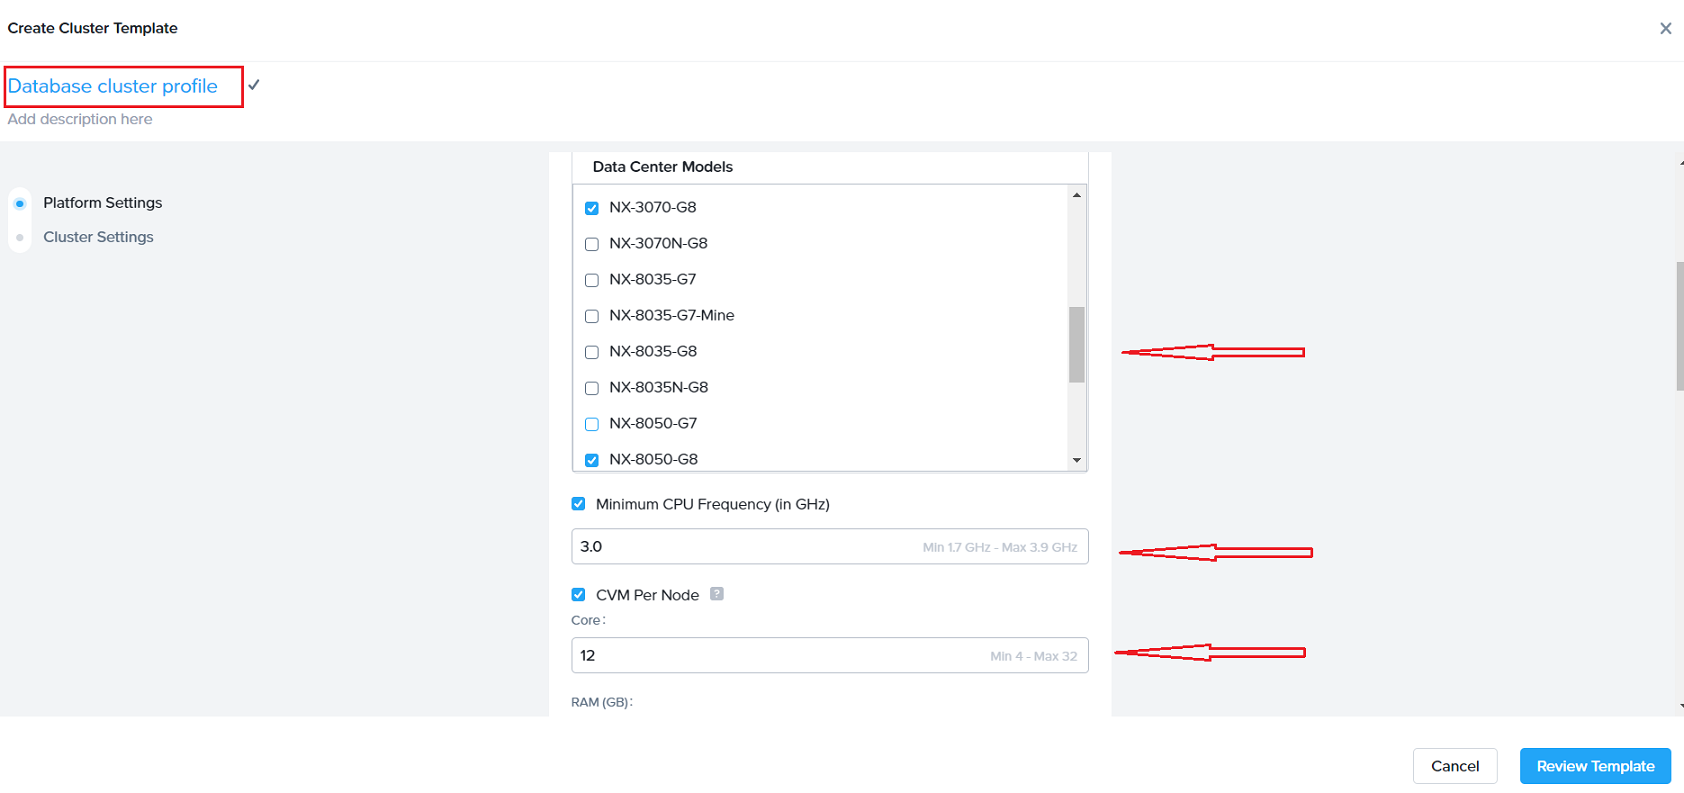
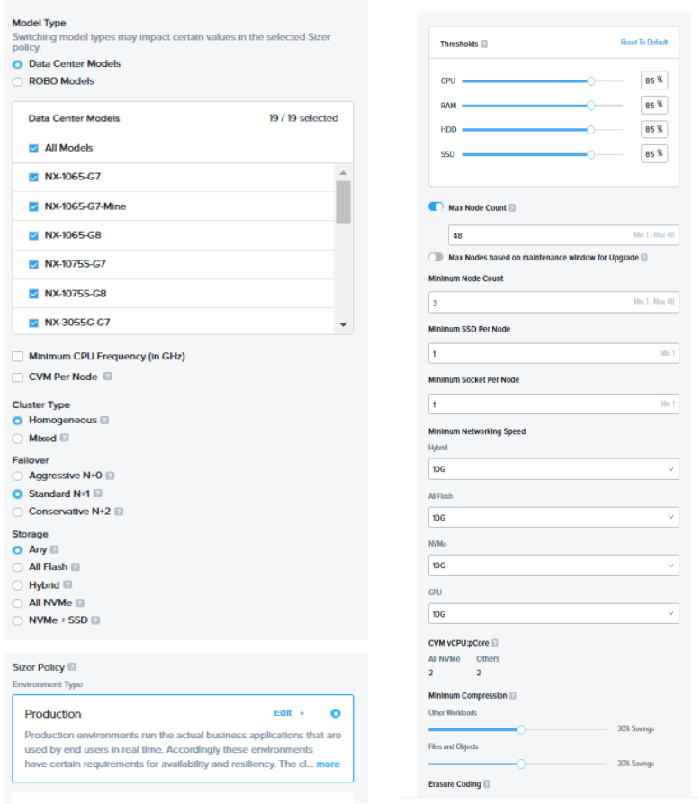
Next, on the cluster settings screen, enter a name for the profile (eg Database cluster template) and select settings (certain CPUs, CVM allocations, preferred platforms and many more attributes shown in next section)
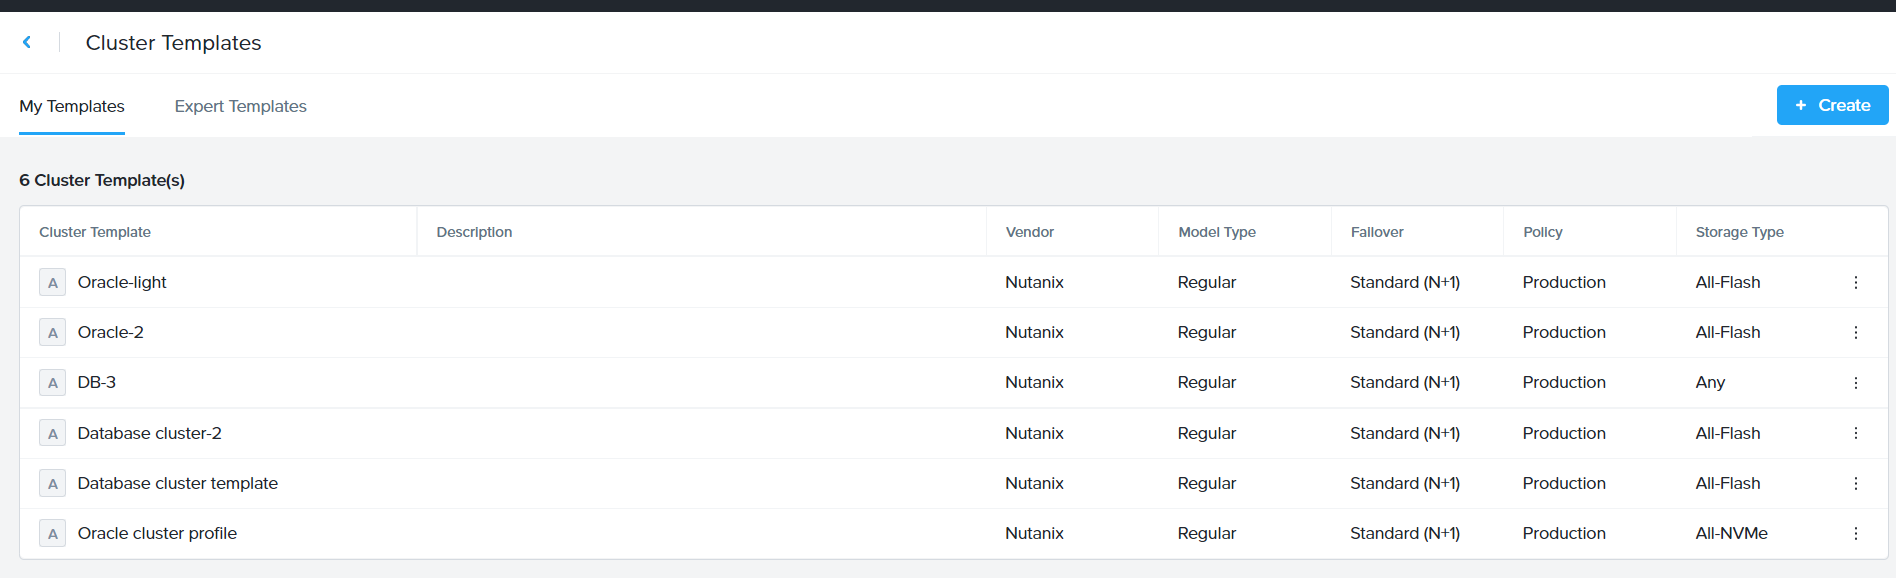
Click “Review” and then “Save” the profile which starts showing in the Cluster template dashboard (shown below)
Save Template while creating the scenario
To provide flexibility and for users to be ‘in context’ while creating/saving a template, additionally, an option in Sizer is to save a particular cluster setting done for a current sizing/opportunity as a template for applying in future for a similar opportunity or workload type.
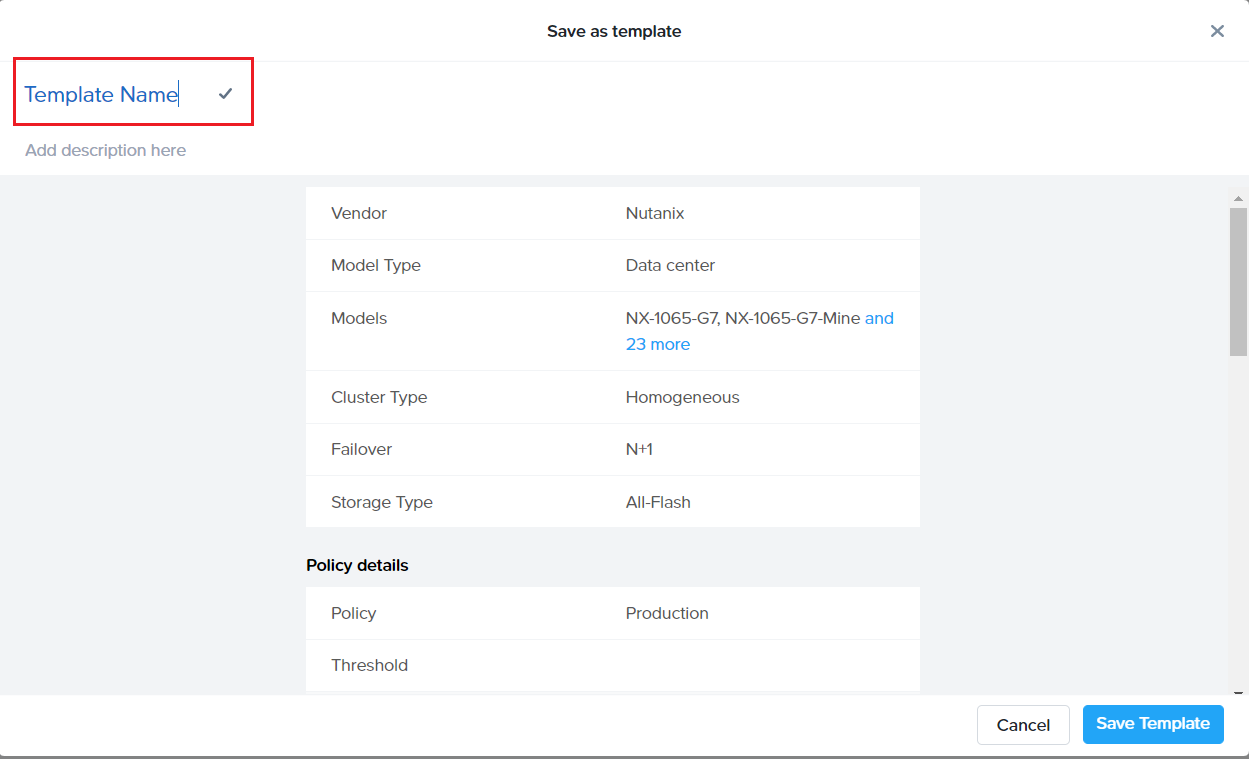
This is provided as an option “Save Template” in the cluster settings page. It saves the current settings in the page (user needed to provide a name for the template) as shown:
Cluster template attributes:
Below is the list of attributes and filters which can be set for the cluster profiles based on the requirement of the cluster/customer.
Cluster Profile attributes
sample values
Data Center models / Robo Models
NX 1065-G8/1075S/3060…
Minimum CPU Freq(in GHz)
1.7
CVM per Node
Cores(physical)
4
RAM
28
Cluster type
Homogeneous
Failover
Standard(N+1)
Storage
Any
Sizer Policy
Production
Threshold %
CPU
85%
RAM
85%
SSD
85%
HDD
85%
Minimum Networking speed
10G
Minimum SSD per node
1
Minimum socket per node
1
CVM : vCPU:pcore
2
Compression % (default)
30%
ECX
OFF
Cluster settings UI in Sizer:
What is an Expert Library ?
Expert library is exactly same as the cluster profiles except that instead of the users defining the cluster profiles themselves, these profiles are created by experts in their respective areas.
The Expert library of cluster profiles is listed by workloads. For ex: Database experts know best what an Oracle cluster should look like and apply the settings accordingly. Similarly, there are libraries for VDI, Files , General purpose Server Virtualisation etc.
SEs and partners would just need to apply these libraries during creating a sizing for the respective workload/s from the cluster settings page (explained in detail in next section).
Expert Library is a separate tab next to the user defined cluster profile in Sizer.
How to use Cluster template/Expert libraries ?
While creating a sizing, on the cluster settings page, click on ‘Apply cluster template’ which pops up the list of user defined profiles and expert libraries. SEs can select any and have a quick view of the set attributes and hit apply. This will automatically select values in the cluster settings screen for the scenario which is being sized.
Similarly, as shown in the below image, using the Save template button, a new Profile can be saved from the cluster settings page of a scenario being sized. This becomes handy for leveraging the work done in manually setting the filters for current sizing for future reference for a new sizing.
For example: If an SE is sizing for a customer BestBuy which prefers certain NX models , SE would need to select only those models in platform list in the Cluster settings page for the given scenario. At the same time, they can save this as a template (say naming it as BestBuy template) and can apply every time when sizing for BestBuy opportunity.
List/View/Apply Cluster template while creating a sizing:
HW (Hardware) templates are pre-defined node configurations that can be created and saved by user. These will appear in their list of saved HW templates and can be used/applied while current or future sizings.
Similar to Cluster templates, HW template is a user-defined settings, only difference being HW templates allows to create exact specific HW config whereas Cluster templates provides attributes or settings guiding the sizer to pick up best configuration.
How can one create a HW Template?
There are two ways to define your fixed configuration of node via HW templates:
One – Upon landing to sizer (my scenario) dashboard, users can click on “Templates” and select HW Templates which opens up the HW configuration page ( similar to Manual mode page) where they can choose the vendor / platform and everything else (CPU/MeM/SSD/HDD/NICs/GPU)
Second – In order to save the effort, users can also create the HW templates while in the midst of a current sizing. While in a sizing exercise, in manual mode, when users would be defining a configuration , they can also quickly save it as a HW template in one additional step by giving it a name (either for a workload or by customer for example: HW Template-Databases, or HW Template-BestBuy)
How to use the HW templates ?
The objective for HW template is that you create once and use every time for that particular situation ( by workload or for a particular customer or any other scenario).
After creating the workload, when users are presented the Cluster settings/Sizing options screen, it shows them the option of HW Templates which can be applied for that sizing. This is in along with the other Cluster / SW settings they would like to use for that scenario. Sizer , then, iterates through the different solutions meeting the workload criteria and the cluster settings but restricting itself to only the HW Template(s) that the user selected for that sizing. Sizer would then recommend the right number of nodes (of the selected HW template(s)) meeting all the workload and cluster settings criteria.
How is HW Templates useful ?
The biggest advantage for HW Templates is that it optimizes the sizing activity for situations where their is a fixed BOM involved. That could be whether based on a customers existing server farm or a Service Provider or a reseller/distributor with a fixed BOM(like Arrow with custom built HPE configs) or simply SE preferred config for a given workload.
Another use case can be for upgrades. SEs can define the NG8 equivalent of their older HW upgrades(like NX G5) and always map the existing cluster on older models to a mapped one via Templates.
Once the config is fixed, Sizer then comes up with number of nodes avoiding any back and forth for number of nodes of that BOM to meet the criteria.
Also, for future sizings for the similar criteria, users need not do all the manual exercise all over again (and even run the risk of manual errors) but simply import the HW Template for that criteria and get uniform/consistent sizing in one single click.
While creating the fixed BOM configuration, HW Templates also ensures all the platform rules are adhered to. Additionally, after importing the templates, users can edit/modify configs and tweak it from the original template and before going ahead with the sizing, can save the edited template with a different name.
Here is a short demo on HW Templates, how to create and use :